Forming and Norming The NorQuest Faculty Community of Practice NorQuest has officially started. At the time of writing this we have approximately 40 members who will be participating through networking, online gatherings, resource sharing, team inquiry and mentorship. One of the first things done was to establish Learning Teams, each with a particular instructional focus. Combining some of the 8 suggestions we have settled on three independent groups:
Each group will now be looking to have an initial meeting so they might chart out their next steps. If you would like to join one these teams, just shoot me an email and I’ll add you. It is not too late, we’re only taking the first few steps! I’m hoping that, in the first couple of meetings, each team will have a chance to form and norm. They’ll need to consider their purpose, how often they would like to meet (and when) or how they would like to carry on conversations and inquiries. To support each group in this initial planning I put together a few questions that might help them focus and perhaps build a bit of a “team charter” 1) What would you like your team to be called/known as? (these names were only place holders) 2) Who are the members of your team? 3) How might you describe your team to others who may want to join? (in 2-3 sentences): 4) What are your team’s major goals? Do you hope to:
8) How will you know that the team should shut down? The last question is often one that often gets overlooked. However, from years of working with learning teams (Professional Learning Communities), I know that teams eventually lose their steam and members look to find a new challenge. This life cycle corresponds with Bruce Tuckman’s five stages of group development: forming (gathering the team and choosing a focus), norming (deciding on the processes and procedures), storming (experiencing tension as boundaries are pushed), performing (producing important work) and adjourning or mourning (fulfilling the original purpose or losing focus and energy) (Tuckman, 1965 and Tuckman & Jensen, 1977). It is important to acknowledge this cycle and perhaps even re-visit question #8 on a regular basis to check whether the team is alive and relevant. In the coming months, we will also look at developing a bit of a cross-faculty mentorship group. I realize that a number of departments already have some type of mentorship for new hires, but there is room for something that would function across the institution. When I asked if instructors were interested in participating in such a program, quite a number said that they were. Some were instructors who were new to NorQuest, but many were not. And there were instructors who said that they would like to participate as both a mentor and a mentee. There were areas of teaching that they were quite confident in, but there were some other areas where they would appreciate a sympathetic friend who might provide them with feedback or share approaches techniques or apps or help them work through the intricacies of Moodle and BBCU. It’s my belief that the larger Community of Practice together with the targeted Learning Teams and a Mentorship Program could provide an important vehicle for community building and professional development for faculty at all stages of their career in post-secondary education at NorQuest. Now we’ll just have to see if this becomes a reality! References: Tuckman, B. W. (1965). Developmental sequence in small groups. Psychological Bulletin, 63(6), 384–399. https://doi.org/10.1037/h0022100 Tuckman, B.W., & Jensen, M.A.C. (1977) Stages of Small-Group Development Revisited. Group & Organization Studies. 2(4), 419-427. https://doi.org/10.1177/105960117700200404 
1 Comment
It’s simply not enough to mention ideas, either in a textbook or in a lecture. No matter what learning theory you subscribe to (constructivism, information processing, behaviourism, cognitivism) all agree on one thing: to remember ideas, learners must act upon them. Period. You can have students move their noses above any number of pages, left to right, top to bottom, but that is neither teaching nor learning. (Harvey Daniels and Steven Zemelman in Subjects Matter, 2004, p.146) So how do I do this? 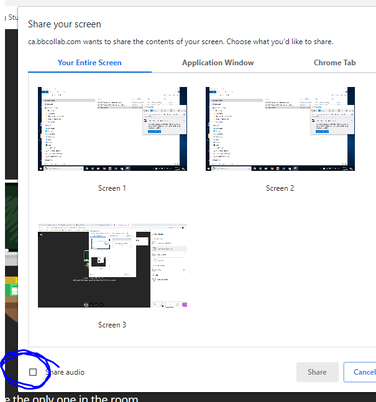 his past week I fielded a few questions about sharing videos and audio clips in Blackboard Collaborate Ultra. In particular, how to stream videos from your computer through Blackboard (or any other conferencing app) to each of your students. It can be done, but I really don’t recommend it. If you have a short clip or audio file that you want to share, you need to share your screen and make sure that you share your audio (see illustration). Otherwise, your students will only hear the audio through your microphone and it will be faint, competing will all the other noises in your house. But I still don’t recommend it. In my experience, the best way to share a video or audio clip is to post the link to the clip in the chat box and provide enough time for the students to access it, watch it (or listen to it), and then rejoin the lesson. When you try to “simulcast” something through a conferencing software it can get garbled by internet connections and bandwidth and the experience for the student can be extremely frustrating. Many of our students are quite a distance away (Asia!). Just imagine how many routers these videos will get processed through! If the video clip is one you made yourself, you are best to post it on your Moodle course and then ask students to access and watch it when it seems appropriate.  So how should I do this? Personally, I really like the idea of asking students to watch short videos, listen to audio files or do short readings during a synchronous class. We always did this kind of work when we had students face-to- face, why not online? Such work gives instructors a break from talking and gives the whole class a “muse” to examine and discuss. However, there are some things to think of when we assign such work in a synchronous class.
I find it helps if you:
However, just asking students to quickly watch something and then report back is not enough. We need to think of three different stages when it comes to such an activity:
Anticipation (sometimes called front-loading) Before you share a clip or reading with your students, you need to be clear of the instructional purpose for such an activity. What are the students going to encounter? Why is this important? If your learners feel that you are just “filling up class time” or that this is something that is “nice to know”, but not “need to know”, they might not come back to class when you want them to. As such, it helps to prepare your learners for the clip or reading. To whet their appetite. To build some anticipation. It also helps to give them a Central Purpose Question. “As you watch this clip, I would like you to notice…” “What assumptions is the speaker making?” “How might you…” Giving students a purpose for reading, listening or viewing and providing a lens or focal point will help students feel more engaged and give them something to share when they return to the lesson. Instructors who are aware of this anticipation stage take time to find out about their students, draw on some of their interests, and incite curiosity and wonder before they tackle very significant and meaningful content. This kind of front-loading helps to ensure that the learners will be interested and inquiring and not dispassionate or overwhelmed. Consolidation Consolidation is the part of the process where learners consider and weigh new concepts, personalize them and store them for retrieval and further consideration. When our students read, listen or watch something new, they activate a number of important thinking processes. Skillful learners will make:
Consolidation involves work and for some people this kind of work comes very naturally. Unfortunately, many of us need a bit of help (guilty as charged!) and rely on strategies that serve to aid us in comprehending, personalizing and holding meaning. Highlighting, annotating, note-taking, using graphic organizers, collaborating and sharing our questions and discoveries with others are all ways in which we have made new information more real and lasting to us. It is no different for our students, many of them need to discover and employ strategies that can assist them in consolidating their learning. It is our job to help these learners to become more “metacognitively aware”. We can do this by asking the students to record their connections, inferences, predictions and judgments on a shared document, an online forum, a Padlet, a Mentimeter or a Flipgrid video. Extension Extension is the part of the learning process in which we make our new discoveries come alive through written and spoken expression, demonstration, representation and further inquiry. This gives the students an opportunity to make choices about what they think is most significant and how they want to use the new understandings they have gained. As the quote from Daniels and Zemelman related, students need to act upon what they have heard and seen in order to truly understand, integrate and appreciate. In order to accomplish this, instructors need to give meaningful assignments that challenge students to think rather than regurgitate. And this is what we mean by extension. Extension is not the end of the learning process but, rather, it is a springboard to further learning.  This week I would like to share another of my favorite teaching strategies with you. I have used it for units on independent living, on globalism, on themes in Hamlet, and on teacher professionalism. The Anticipation Guide is a strategy that will work whenever you have course components that call for rich and nuanced understandings. What is it? The Anticipation Guide (Herber, 1978) is a simple strategy that can lead to some very complex and involved thought and discussion. This strategy challenges each student to access prior knowledge, set a purpose for learning, and find evidence to justify or disprove controversial statements. It follows the TPS (think/pair/share) format but gives more structure. You can use this strategy when you start a new unit, when you assign an especially important (and insightful) reading or viewing, or when you want to explore some of the central themes in the course program. With an Anticipation Guide, learners respond to five, six or seven interesting statements. These statements should reflect some of the upcoming themes and issues in a lesson or unit. For instance, imagine asking learners to agree or disagree with the following statements about our current Covid situation and to be prepared to explain their choices:
As you can see, the statements need to be “juicy”. They need to elicit anticipation, discussion and debate. Moreover, if you are using the Anticipation Guide to get at central themes in a unit, the statements might probe at understandings and misconceptions around key learning outcomes. So your first step is to carefully consider what it is you want to highlight and then come up with some statements that are true, false or very debatable. How do you use it? Once you have come up with your five to seven statements, you should put them in an organizer such as the one shown below. The students need a place to capture their thinking so they can re-visit their perceptions at the end of the lesson or unit and see if they have changed in their viewpoints and understanding. This organizer could be a shard document on a Google or Sharepoint drive or it could be something you have uploaded to your LMS (Moodle course). When you use an Anticipation Guide, you need to give learners enough time to think about each question and respond. It helps if at least a couple of the statements you construct cause learners to reflect and consider alternative viewpoints. Moreover, asking the learners to agree or disagree forces learners not to “fence sit” and to consider the implications of their choice. This part of the process could take from 3-10 minutes depending on the group you are teaching and the quality of statements you construct. Some instructors also ask learners to write down their reasons for their stance in a short justification. The next step is to ask learners to share their responses with a partner and to explain their reasoning. If you teach online, it would require setting up breakout rooms for two or three students. Ideally, you do not want to have learners share their responses with too large a group. Each student needs to feel safe and heard. That often does not happen when you put students in too large of a group. When they are ready for it, you might ask the learners to share some of their discussion with the whole class. This is made a little easier because they have already had time to negotiate ideas and viewpoints in pairs or triples and would only have to volunteer what they felt comfortable sharing. This sharing and discussion can sometimes take a lot of class time, but it is very valuable. The learners will have chewed on some very important ideas, they will have had to consider their own views and background knowledge and they will be ready to hear and explore a variety of perspectives and ideas. The pump will have been primed and the learning engine should be firing on all cylinders! Finally, at the end of the lesson or unit you might have the learners revisit their initial responses. Have they changed their stance? Why? What did they learn from reflecting, responding, discussing, reading or listening and then reflecting once again? Some instructors ask their learners to write out their conclusions or relate page and paragraph numbers that support their re-evaluated stance. Herber, H.L., & Herber, J.N. (1993). Teaching in Content Areas with Reading, Writing and Reasoning, Allyn & Bacon 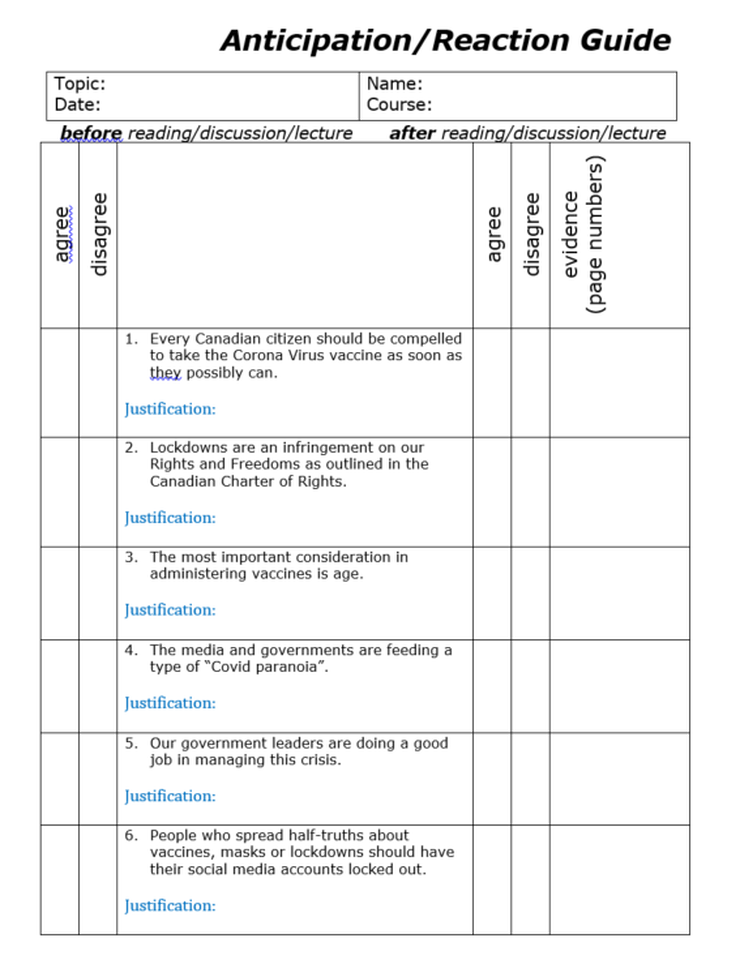 |
AuthorJeff Kuntz Ph.D. 
ImagesExcept where indicated, images used in the blog posts are personal photos, images from NorQuest College or images from Pixabay. Pixabay is a vibrant community of creatives, sharing copyright free images, videos and music. https://pixabay.com/ Archives
March 2024
Categories
All
|
 RSS Feed
