|
NorQuest College students, might use recipe cards as a creative and effective tool to study and memorize important concepts. Recipe cards provide a compact and organized format for summarizing key information, making them ideal for self-assessment and quick review. Here's how our students can use recipe cards for studying, using nursing studies as an example:
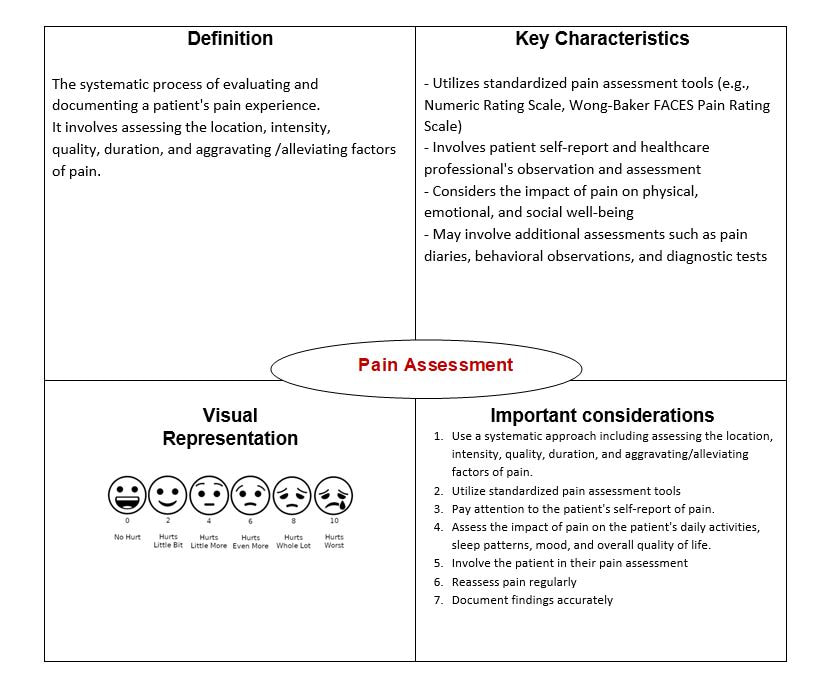 In this Frayer model for Pain Assessment, the term "Pain Assessment" is defined and its key characteristics and examples are outlined. The visual representation section can include diagrams, flowcharts, or illustrations related to pain assessment, which aid in visualizing the concept.
Remember, the Frayer model is a versatile tool, and you can adapt its sections and format to best suit the specific nursing concept you are studying.
By employing recipe cards in their study routine, college students can leverage the power of concise summarization, self-assessment, and active recall. These techniques aid in consolidating knowledge, reinforcing important concepts, and promoting effective learning.
0 Comments
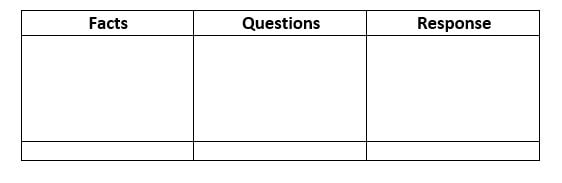
What is it? Facts/Questions/Response is a literacy strategy used to encourage students to think actively about information that they read by applying the thinking processes I’ve written about before: Readers are more engaged and successful in learning when:
A three-column chart is used to record the Facts, Questions, and Responses. Students determine importance as they retell or summarize textual information in the Facts column using jot notes. They reflect about the textual information by recording questions asked in the Questions column. They make connections, make inferences, and visualize as they record their relating and reflecting responses to the textual information in the Response column. The FQR strategy helps those students who
How to use it:
  5 R’s Notetaking This morning I’ve highlighted a strategy you might share with your students… How to use it:
Based on the Cornell note-taking system from Walter Pauk 5 R’s Note Taking Record – Reduce – Recite – Reflect – Review 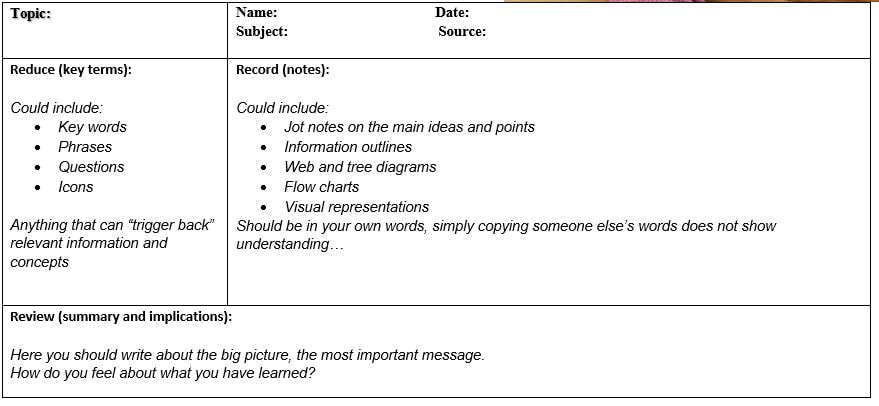  This week I would like to share another of my favorite teaching strategies with you. I have used it for units on independent living, on globalism, on themes in Hamlet, and on teacher professionalism. The Anticipation Guide is a strategy that will work whenever you have course components that call for rich and nuanced understandings. What is it? The Anticipation Guide (Herber, 1978) is a simple strategy that can lead to some very complex and involved thought and discussion. This strategy challenges each student to access prior knowledge, set a purpose for learning, and find evidence to justify or disprove controversial statements. It follows the TPS (think/pair/share) format but gives more structure. You can use this strategy when you start a new unit, when you assign an especially important (and insightful) reading or viewing, or when you want to explore some of the central themes in the course program. With an Anticipation Guide, learners respond to five, six or seven interesting statements. These statements should reflect some of the upcoming themes and issues in a lesson or unit. For instance, imagine asking learners to agree or disagree with the following statements about our current Covid situation and to be prepared to explain their choices:
As you can see, the statements need to be “juicy”. They need to elicit anticipation, discussion and debate. Moreover, if you are using the Anticipation Guide to get at central themes in a unit, the statements might probe at understandings and misconceptions around key learning outcomes. So your first step is to carefully consider what it is you want to highlight and then come up with some statements that are true, false or very debatable. How do you use it? Once you have come up with your five to seven statements, you should put them in an organizer such as the one shown below. The students need a place to capture their thinking so they can re-visit their perceptions at the end of the lesson or unit and see if they have changed in their viewpoints and understanding. This organizer could be a shard document on a Google or Sharepoint drive or it could be something you have uploaded to your LMS (Moodle course). When you use an Anticipation Guide, you need to give learners enough time to think about each question and respond. It helps if at least a couple of the statements you construct cause learners to reflect and consider alternative viewpoints. Moreover, asking the learners to agree or disagree forces learners not to “fence sit” and to consider the implications of their choice. This part of the process could take from 3-10 minutes depending on the group you are teaching and the quality of statements you construct. Some instructors also ask learners to write down their reasons for their stance in a short justification. The next step is to ask learners to share their responses with a partner and to explain their reasoning. If you teach online, it would require setting up breakout rooms for two or three students. Ideally, you do not want to have learners share their responses with too large a group. Each student needs to feel safe and heard. That often does not happen when you put students in too large of a group. When they are ready for it, you might ask the learners to share some of their discussion with the whole class. This is made a little easier because they have already had time to negotiate ideas and viewpoints in pairs or triples and would only have to volunteer what they felt comfortable sharing. This sharing and discussion can sometimes take a lot of class time, but it is very valuable. The learners will have chewed on some very important ideas, they will have had to consider their own views and background knowledge and they will be ready to hear and explore a variety of perspectives and ideas. The pump will have been primed and the learning engine should be firing on all cylinders! Finally, at the end of the lesson or unit you might have the learners revisit their initial responses. Have they changed their stance? Why? What did they learn from reflecting, responding, discussing, reading or listening and then reflecting once again? Some instructors ask their learners to write out their conclusions or relate page and paragraph numbers that support their re-evaluated stance. Herber, H.L., & Herber, J.N. (1993). Teaching in Content Areas with Reading, Writing and Reasoning, Allyn & Bacon 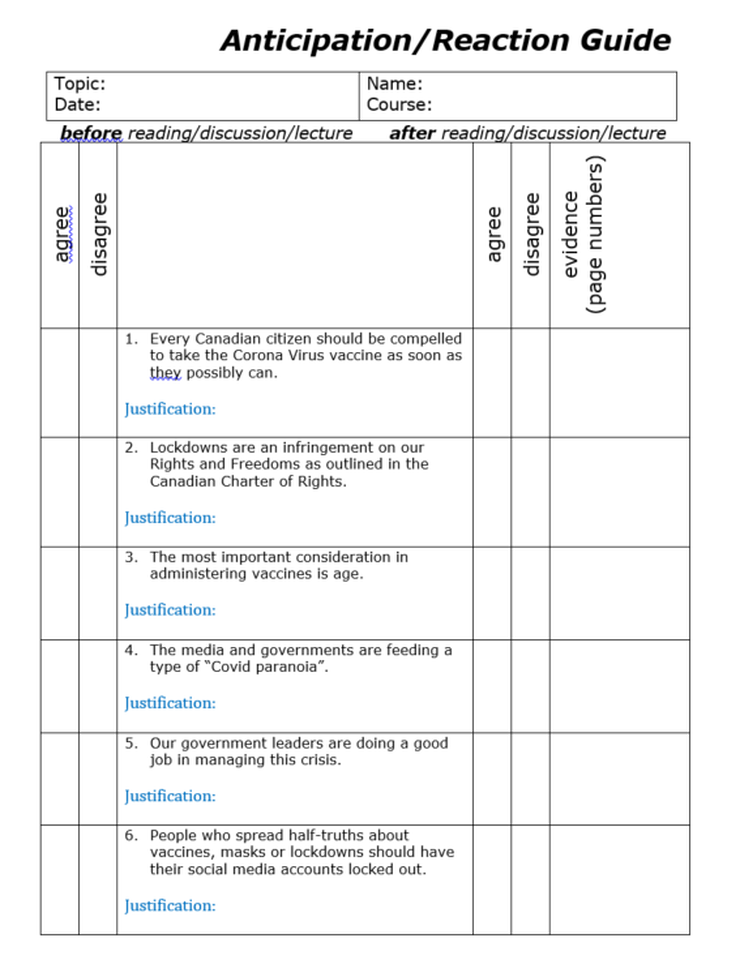 One Physics Teacher’s Experiment in Teaching A number of years back, when I was in a role very similar to the one I have now, I had the pleasure of working with high school teachers as they integrated changes related to literacy, assessment, inquiry, and differentiated instruction in their coursework. One of the teachers, who taught high school physics in a large urban school, invited me to come and attend his classes to provide feedback. For the purposes of this piece, we will call him “Fred”. Fred had been teaching for 30+ years and he was finding it more and more difficult to deal with the “busy-ness” of teaching. He was considering retirement (he had reached the magic number), but Fred also knew that he loved teaching, and he loved working with teens; he was just getting tired. Many of Fred’s classes were in a combination classroom and lab. On lab days, students were expected to spend the first 20-25 minutes in their desks listening to Fred explain the day’s experiment. Fred was very prepared; he had PPT slides, a two-page handout and a raft of notes to work from. On lab days, the students would often trickle in, in dribs and drabs. The school had a number of athletic teams and interest groups, so students had difficulty getting to their classroom right on time. Such was the case for the two classes that I spent with Fred and his class. Students trickled in, got settled and then waited to be re-oriented to the lesson and to Fred’s expectations. “So this is what is getting to me Jeff,” Fred shared, “I feel like the first 25 minutes of class is nothing but false starts. I start explaining the experiment, then a couple more trickle in and I have to start over. Then, even when they are all here, some students are not really paying attention and they will ask the same question that I had just finished answering for several other students. Meanwhile, other students have already read the whole handout and are asking me questions that most of the class is just not ready for. By the time we move to the back of the classroom (to the lab part), I’m exhausted and feel like I’m going to lose my voice. And once we get started on the experiment, I find out just how many students still didn’t get it!”  After a couple of visits, Fred and I sat down together and discussed ways forward. First, we took a close look at what was actually going on:
Next, we asked a key question: “Who is actually doing the work?” Fred had to confess that, in spite of all his good intentions, he was actually the one doing the work. He made the handouts, prepared the notes, and gave the explanations. The students just had to sit back and listen (or not). We decided to put the onus for learning back on to the students! Yes, we would provide them with scaffolding and support, but we were not going to spoon feed any longer. The next lab class, Fred made a point of meeting each student at the door. As they came in, he gave them the two-page handout, a highlighter and a one-page graphic organizer. In a hushed voice, he asked the students to come in quietly and to get down to reading ASAP. Further instructions were written on the board. On the board, Fred had written the following directives:
K - What do we know already? What are the givens for this experiment? What are the conditions? W - What do you want to know? What phenomena are were really investigating? H - How will we go about testing to see what happens under certain conditions? What are the critically important steps in our experiment? L - What did we learn from the experiment? How should that be represented? How can it be replicated? S - What is the significance of what we have discovered? How might it be applied to real world applications? It took only a class or two for the students to catch on to the new routine. Fred no longer had to greet them at the door; the students just came in, picked up the materials (handout, highlighter and graphic organizer) from a front desk, and settled in to work. There were significantly fewer false starts and repeated explanations. When I next met up with Fred, he seemed to have a bit of a spring to his step. “It’s been a life-saver, Jeff! I am so glad we decided to make those changes. The students who are keen can get going as soon as they are ready and those who struggle I can sidle up to and work with quietly as they work through the KWHLS. Wow!”  The Need to Step Back and Seek Input
I’ve shared this anecdote, but not because of my part in it. Indeed, Fred was the one who went through the reflective process; he identified an issue, sought a second set of eyes, discussed some of the underlying issues, chose a course of action and then skillfully and persistently put this plan into place. I just asked a few timely questions and shared some strategies that might help (we discussed many more options than the one he chose). The process that Fred and I went through is called: “instructional coaching”. As one of my mentors explained to me years ago, “to coach” in situations like this is not really acting like some kind of athletic coach, trying to get the best out of his athletes. I would feel funny yelling encouragement and guidance during an instructor’s lesson - “Atta go! Wonderful motivational bridge, Now let’s get to the outcomes!” Instead, to coach, means to provide the conveyance (like the old horse drawn coaches) so that instructors can work from one place or teaching challenge (a muddy spot) toward an easier or more efficient path. This “coaching” is done by careful observation and thoughtful feedback and questioning and not through pointed advice or judgement. There really is a bit of an art to it. In the last few years, Joan Wall, Sarah Apedaile and I have all had the chance to provide a bit of coaching to countless “Freds” at NorQuest. It has been great! Instructors have asked us to visit their classrooms (both physical and online) to seek feedback on their practices and routines. I love this part of my job. I get to watch true professionals in action and I get to step into learning environments that are vibrant and intellectually stimulating! In one morning, I can learn how to put in an IV line, balance the books, apply for a job, and formulate an effective thesis statement. If you are interested in having a faculty developer like Joan, Sarah or myself, work with you, just send an email our way. However, you might wait a week or two before doing so though. At the moment, it is a very busy time as many faculty need support facing up to tech challenges in teaching online for the first time (and Sarah is on leave for the next few weeks). You might also line up coaching conversations with a teaching colleague, where you visit each other’s classes and provide feedback. Just remember though, this process is not about evaluation; it is about reflection and growth. Look for someone who will challenge you to see possibilities, not push you towards their own preconceived notion of best practice. |
AuthorJeff Kuntz Ph.D. 
ImagesExcept where indicated, images used in the blog posts are personal photos, images from NorQuest College or images from Pixabay. Pixabay is a vibrant community of creatives, sharing copyright free images, videos and music. https://pixabay.com/ Archives
March 2024
Categories
All
|
 RSS Feed
